Google Chrome not Responding
There can be several reasons behind this abrupt behavior exhibited by Google Chrome. Probably, low-speed internet, lost internet connection, heavy use of system memory or bugs can be one of the cause. There are numeral solutions to the issue mentioned above.
Method 1: Update Google Chrome or Reinstall the new version
The problems at times are reported because of using the older version of Chrome. The solution to it can be either done by reinstalling Google Chrome or updating it. For Updating:
Step 2- From the Control Panel window, locate Program and Features.
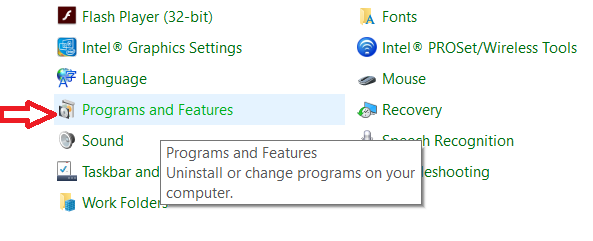
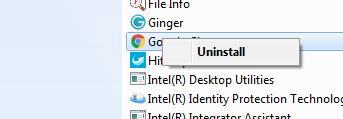
Step 4-After that, Select Google Chrome and Uninstall it.
Step 1- At First, Open Google Chrome
Step 2- Then Click on more option present in the top right corner of the window.
Step 3- Finally, Click on Update Chrome and restart Google Chrome.
For Reinstalling:
Step 1- At First, Go to the Start Menu and type Control Panel on the search bar.
Step 5- The program will uninstall.
Step 6- Finally, download the latest version of the browser from the official site.
Method 2: Delete the History, Cookies and unwanted Apps on Google Chrome
The heavy memory usage can be the cause of the problem. To fix it, clear all cookies and unwanted apps from your browser.
To clear the cookies:
Step 1- At First, Go to Settings, by clicking on the button of the Chrome present at the top right corner.
Step 2- Now Navigate below the screen to click on Show Advanced Settings.
Step 3- Then, click on Content Settings followed by All Cookies and Site data.
Step 4- Finally, Click on the Remove All button to delete all the cookies.
To clear unwanted apps:
Step 1- At First, Type chrome://apps/ on the browser address bar
Step 2- Then Right-click on the target app and remove it.
Method 3: Modify Properties of the Browser
By applying changes to the properties of Google Browser, the fix to the issue of Google Chrome Keeps not Responding issue can resolve. The steps can be lined as follows:
Step 1- At First, Right-click on the Chrome icon.
Step 2- Then Click on Properties.
Step 3- Select the Compatibility Tab.
Step 4- After that, Click on the button with the label Change Settings for All Users.
Step 5- Un-tick the option Run this program in Compatibility Mode.
Step 6- Then Check the option Run this program as an administrator under the Settings.
Step 7- Click Apply to save the changes you mode followed by OK.
Step 8- Now you can close the Properties window.
Method 4: Add Reliable Multicast Protocol
One can go ahead with this technique if Google Chrome has Stopped Working issue persists. There are a certain number of steps to follow as mentioned below:
Step 1-At First, Press Windows key + R to open the Run Window.
Step 2- Then type ncpa.cpl into the text field and hit Enter.
Step 3- Under Network Connections section, right-click the currently working network adapter for Properties.
Step 4- Navigate below to choose the Microsoft Network Adapter Multiplexor Protocol.
Step 5-Then Click Install button below.
Step 6- Select the Protocol option.
Step 7- Then Click Add button.
Step 8- Select Reliable Multicast Protocol.
Step 9- Finally, Click OK to save the changes you made.
Restart the computer and relaunch Google Chrome.
Method 5: Reset the Chrome
At the time of customization and change in settings, there is a scope of unnecessary changes made to the browser which restricts it from working. The changes that you previously made can lead to errors many at times; henceforth we suggest to reset all the changes made to set it back to the initial point. The steps are as follows:
Step 1- At First, Go to Settings, by clicking on the button of the Chrome present at the top right corner of it.
Step 2- Navigate below the screen to click on Show Advanced Settings.
Step 3- Now, click on Reset Settings.
Step 4- Finally, Restart your system and check for Google Chrome. This can also help you fixing other minimal errors like Your Connection is not Private for some websites.
Method 6: Fixing the error using SFC (System Files)
SFC system files are the feature provided by Microsoft to check the corrupted file. Follow the given steps.
Step 1- At First, Press Windows key + R to open the Run Window.
Step 2- Type sfc.exe into the text field and hit Enter.
Step 3- The Microsoft will then scan the error and fix it automatically.
Source :